How to knit the Hundred Stitch Snood in three easy steps
(additional notes and a materials list below)
1. Cast on 100 stitches using a stretchy cast on method, join into the round.
2. Knit every single stitch until only 4m of yarn remains
3. Cast off using a stretchy cast off. Weave in ends, wash and block.
Voila! Warm neck!
So, I know you’re thinking “Meg, these instructions are so minimalist, they make an Ikea flatpack manual seem like War and Peace”. I know! They are the easiest thing to make, and one of the best things to make for beginners who are just stepping out into circular knitting. You also actually want to wear it, and as a beginners project, that’s a real bonus. The materials list and the notes below are aimed at beginners, so if you’re more experienced, you may think this is a bit over-explained.
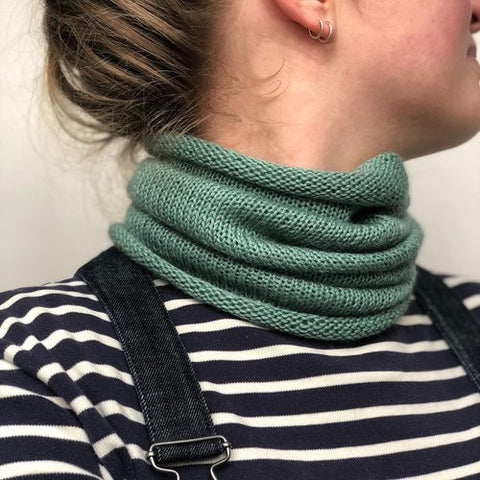
The finished measurements of this snood are 45 x 22cm.
You Will Need:
-
1x 50g ball of Sandnes Garn Alpakka Silke (pictured is colour 7741), but you can use any 200m of some slightly more luxurious 4ply yarn. Anything with nice drape would work well. A wool/silk blend such as Regia Silk Sock Yarn, a pure silk, a cashmere, a soft merino, a bamboo, a viscose, as long as there’s 200m. Exact gauge isn’t crazy important, but should be around 27 stitches per 10cm once blocked.
-
1x 3.25mm 40cm circular needle. You absolutely could use a set of DPNs if you felt like it, but you’d make your life easiest by using a circular. The needle needs to be 40cm because when you’re working in the round, the circumference of the needle needs to be the same size or smaller than the circumference of whatever you’re knitting.
-
Darning needle. You won’t need this until the end, this is to weave your ends in once you’ve cast off, so don’t immediately panic if you don’t have one.
Super Stretchy What?
For this pattern, you’ll need to nail a stretchy cast on, and a stretchy cast off. This is because the hundred stitches in this will only go over your head if your cast on and cast off allows it to, as your neck is smaller than your head.
I’m a fan of Jeny’s Surprisingly Stretchy Cast on and Bind off. They go a long old way!
Here’s a good YouTube Tutorial for the Cast On (I am also a fan of this channel for learning lots of techniques, and there are specific left hander videos)
Here’s a good YouTube Tutorial for the Cast Off (I don’t know much about this channel, but I can see they have some other excellent technique videos too)
Weaving in the Ends
So when you cast on and off, you should leave a good tail, and DO NOT CUT THIS TAIL WHILE YOU’RE KNITTING, no matter how in-the-way it might feel. Your tail should be the length of your longest finger, if not longer. You need to weave the ends in once you’ve finished casting off.
I like the method in this YouTube Tutorial by Very Pink Knits (who also make an excellent video on Joining into the Round)
 Meg, tell me about wash and block? What is that?
When you knit, there will be micro-changes in the tension as you knit. This will leave lumps, bumps, some stitches looking a little uneven, some just not sitting as flat as the others.
You get these tension changes by relaxing while you knit, changing your position, switching from Continental to English style knitting just to try it out, dropping the yarn, the ball being trapped under the cat etc etc. Every knitter has tension changes in their knitting.
EVERY. SINGLE. ONE.
Washing and blocking helps to make everything just look that 20% better.
Washing is easy
Washing is easy. Washing helps to relax the fibres in your knit, which will help in the blocking process as well as washing off all of your hand-grime and excess dye. Here’s how I wash:
-
Fill a sink/bowl/bucket with some water. The snood is only small, it doesn’t need much water, so you’ll probably only need 2 or 3L.
-
Put in some soap or Wool Wash. I’d obviously recommend using the No Frills Wool Wash Bar, but I have vested interests in that (it’s also really great, and I’m fussy with soaps). You can really use anything to wash it - your baby’s shampoo, a little blob of face cleanser, a tiny drop of delicates wash, a few gratings of the bar of soap by the sink. As long as the water feels slightly soapy, you’re good.
-
Put in your snood, leave it to soak for a bit. Don’t rub, stir or agitate in any way. I normally leave it until I remember, which can range from 30 minutes right up until 3 hours. I’d say for the more impatient among us, 20 minutes is fine.
-
Rinse in clean water, and squeeze out gently.
-
Put your snood on a clean towel and roll it all up together. Stamp on the towel-snood-burrito to get the water out. I normally do this in the bath or the shower so that if it does drip out a little, it’s in a ‘water safe’ space. Trust me, your landlord will not thank you for stamping on a wet towel on your standard-issue laminate floor as it WILL bubble eventually.
Blocking is easy too
That’s right. Super Easy. Blocking (pictured above) is done to set the knit. Picture this: you’ve washed your hair, you’ve put it in plaits, you’ve gone to bed and let it dry and you wake up with ‘set’ hair that’s curly. That’s exactly what you’re doing here: setting the knit in the shape you want it to be. The micro-changes in tension just seem to release here. Blocking takes your knit from “definitely hand-knit” to “YOU MADE THAT?!”. Here’s how:
-
Take your towel-snood-burrito and unroll. Shake out the snood.
-
Find a surface to block on. You can use anything you can stick a pin into, covered by a towel. This could be your bed, the living room carpet, your old housemate’s yoga mat, foam blocking tiles, the baby’s play mats, a cork noticeboard, literally anything. For a snood, it doesn’t need to be very big, so I used a cork noticeboard, but I have used my bed for similar projects before now.
-
Lay your snood flat on this surface. The ends will be curly and the middle will be skinnier than the edges. This is normal.
-
Start pinning one of the longer sides every inch or so, keep it as straight as possible. You can use sewing pins, T Pins, or Blocking Pins (pictured above) Pull it a little as you go to bring it up to about 47 to 50cm. It’ll spring back and curl up a little once you’ve removed it, so that’s why the finished measurement is less.
-
Pin the other longer side, pulling away from the pinned edge. Stretch the snood to be about 22-25cm wide.
-
Uncurl and pin the short edges at a right angle to the longer edges. Your snood should be as square as possible.
-
Let dry completely, this may take an hour, may take a day. Be patient!
Voila! Unpin, shake out, smooth out any pin points in the knitting with your finger, put on straight away!
So what skills do I have now?
Well, if you were to come into the Real Life Shop and asked me for beginner tips, you’ll find I go on an awful lot about ‘learning the skills’. I always recommend you learn these six skills first: cast on, knit, purl, increase, decrease, cast off.
You pick up new knitting skills in every single project, and this is a top-quality skill-learner. It’s an excellent first-knit-in-the-round project, and using these techniques on top of the six key skills above mean that you can knit SO MANY sweaters.
If you’ve followed the pattern and the notes above, you can now do all of the following:
-
Stretchy Cast on
-
Knitting stockinette in the round
-
Stretchy Cast off
-
Weaving in ends
-
Washing and blocking
-
Basic garment knitting